1.Understand how to reset the password of Cisco Router.
2.Understand how to reset the password of Cisco Switch.
Preparation:
1.Usually the switch and the router were given very complex passwords, and we forgot password for many reasons, but the start-config can not be deleted, in this situation, we need to reset the password and keep the start-config.
2.The method of reset password for Cisco 2600 serial and 3600 serial is the same. There is a little different between 2500 and 2600/3600.
3.For Switch, we need to get into “switch:” mode to reset the password: when you restart the switch, press “mode” key (located on the front panel of switch)
Topological
Procedure:
Reset 2600 serial router password (same as 3600 serial)
1.Power on the router, in the meantime, press ctrl+break.
2.rommon>confreg 0x2142
-- Change the start register value to 2142, it means the router will load the factory default configuration in the next start-up.
3.rommon>reset
-- restart the router
4.router#copy startup-config running-config:
-- Now we can enter the Privileged EXEC Mode, we need to copy the old startup-config which was saved in NVRAM to the current running config, remember we don’t want to lose the old configuration except the password.
5.router#config t
6.router(config)# enable password cisco.
-- After we copy the old startup-config, we also copy the old password, so we need to change it to a new password.
7.router(config)#exit
8.router#copy running-config startup-config
-- Save the current running-config which contains the new password to NVRAM
9.router#conf t
10.router(config)#config-register 0x2102
-- Restore the register value to 2102, it means router will load the configuration from NVRAM.
Purpose: 1. Understand the basic commands of Cisco Router. Preparation: 1. What’s User EXEC Mode, Privileged EXEC Mode and Global Configuration Mode 2. The difference between running-config and startup-config. 3. ROM, RAM, Flash and NVRAM 4. The difference of “exit” and “end”. 5. Commands: enable, configure, exit, end, show, ?, copy, hostname, banner, interface, line console, line vty, no, etc.
Procedure: 1. Task 1: Connect Router to PC through RS232.
2. Task 2: Commands: enable, show, clock: 1) Router>enable 2) Router# show version 3) Router# show clock 4) Router# clock set 10:11:00 Dec 22 2008 5) Router# show clock
6. Task 6: Copy current config to start config, and verify the banner and password 1) R2600# copy running-config startup-config 2) R2600# exit 3) Press Enter key to reenter the router, check the banner, you’ll need password to get into user exec mode.
------------------------------------------- 1. For more information, please visit my blog http://jhuang8.blogspot.com/. 2. Video demo is located in http://www.valit.ca/lab/.
You never have enough time to do Code Review if you try to walk trough every functions, instead, we can focus on the “high risk” functions that hackers have been known to take advantage of Web application.
The common potential problem areas are:
1.User input;
2.The third party input that from other untrusted sources, such as external database;
3.The output. For example, the error message may reveal too much information, or a poorly coded application may insert tainted SQL data into a database, which your application would be potentially use it.
Here is the list of “high risk” functions (copy from a PDF file and some websites, I also added some):
1.Buffer overflow
When a particular function/operation writes more data into a variable than the variable was designed to hold, the result is buffer overflow. Fortunately, this only occurs on the languages that must predeclare their variable storage size, such as C and C++. ASP, Perl, and Python all have dynamic variable allocation, which means they can interpreter themselves handle the variable size.
For C/C++, the “high risk” functions are:
(1)str* family: strcpy(), strcat(), strcadd(), strccpy(), streadd(), strecpy(), strtrns(). We should avoid to use these functions
(2)strn* family: strncpy(), strncat(), and so on. This is a safer alternative to the str* family. The strn* family is essentially the same as the str* family except it allow you to specify a maximum length. So we only need to make sure that the specified maximum value is equal or less than the destination variable size.
XSS is in fact a subset of HTML injection. It allows attackers to execute the script in the victim’s browser, which can hijack user sessions, deface web sites, insert hostile content, conduct phishing etc.
Looking for XSS vulnerabilities is tough; the best place to start is with the common output functions used by the language:
(1)C/C++: printf(), fprintf(), output streams, and so on.
(2)Java: Don’t use
(3).NET: the better way is to use the Microsoft Anti-XSS Library freely available from MSDN.
(4)ASP: Response.Write, Response.BinaryWrite,
(5)Perl: print, printf, syswrite.
(6)PHP: print, printf, echo.
3.Information Disclosure
This is not a technical problem, it is quite possible that the application may provide some information that can be used by attackers. For example, developer may insert some output for debug purpose and forget to delete it.
We need to review all the output functions of the language with:
(1)Printing sensitive information (passwords, credit card numbers) in full display.
(2)Displaying application configuration, server configuration information, environment variables, and so on.
(3)Revealing too much information in error message. For example, failed database connections typically spit out connection details that include database host address, authentication details and target tables; failed file inclusion may disclose file paths, which allows attackers to determine the layout of application.
(4)Avoiding the use of public debugging mechanisms in production applications. The better way is to write debugging information to a log on the application server.
4.File system access/interaction
We need to check where, when and how a web application accesses the local file system on the server, the danger lies in using filenames that may contain tainted data.
Calling external programs is danger, if tainted user data is included within the call, an attacker could trick the command processor into executing additional commands, or changing the intended command.
(1)C/C++: exec* family, exec(), execv(), execve(), and so on.
(2)Perl: exec,’’(backticks), qx//, and <> (the globbing function).
Some languages contain mechanisms to interpret and run native scripting code, the advantage is that allows the program to “build” a subprogram dynamically, and user can input fragment script code. However, it opens a door to the attacker who may insert his own script code to be compiled and executed.
(1)Perl: eval function, do, and any regex operation with the e modifier.
(2)Python: exec, compile, eval, execfile, input.
(3)ASP: Eval, Execute, ExecuteGlobal.
7.External objects/Libraries
Including or loading libraries is helpful in making the design of a program easier. However, you need to make sure that all external library loading routines do not user any sort of tainted data, an attacker could coerce your program into loading an alternate library, which could provide him an advantage.
Recently I need to reinstall Windows XP. I know it will take some times to install services packs and IE7, Windows Media Player etc. Is it possible to make a CD that includes these things, so I won’t be bothered by installing them after finish the Windows XP installation?
e. Windows Media Player 11 installer and service packs:
WindowsMedia11-KB929399-v2-x86-INTL.exe
WindowsMedia11-KB936782-x86-ENU.exe
WindowsMedia11-KB939683-x86-ENU.exe
WindowsMedia11-KB954154-x86-ENU.exe
f. Windows XP sp3 and the latest service pack(before Nov 21st, 2008):
WindowsXP-KB936929-SP3-x86-ENU.exe
WindowsXP-KB938464-x86-ENU.exe
WindowsXP-KB941569-x86-ENU.EXE
WindowsXP-KB944043-v3-x86-ENU.exe
WindowsXP-KB946648-x86-ENU.exe
WindowsXP-KB950582-x86-ENU.exe
WindowsXP-KB950760-x86-ENU.exe
WindowsXP-KB950762-x86-ENU.exe
WindowsXP-KB950974-x86-ENU.exe
WindowsXP-KB951066-x86-ENU.exe
WindowsXP-KB951072-v2-x86-ENU.exe
WindowsXP-KB951376-v2-x86-ENU.exe
WindowsXP-KB951698-x86-ENU.exe
WindowsXP-KB951748-x86-ENU.exe
WindowsXP-KB951830-x86-ENU.exe
WindowsXP-KB951978-x86-ENU.exe
WindowsXP-KB952287-x86-ENU.exe
WindowsXP-KB952954-x86-ENU.exe
WindowsXP-KB953155-x86-ENU.exe
WindowsXP-KB953839-x86-ENU.exe
WindowsXP-KB954459-x86-ENU.exe
WindowsXP-KB955069-x86-ENU.exe
WindowsXP-KB956391-x86-ENU.exe
WindowsXP-KB956803-x86-ENU.exe
WindowsXP-KB957095-x86-ENU.exe
WindowsXP-KB957097-x86-ENU.exe
WindowsXP-KB958644-x86-ENU.exe
Here’s what I’ve done:
1.Install Nlite and Wmp11 slipstreamer, you may need to install .NET Framework V2.0 first.
2.Copy all the files in your Win XP CD to a folder, let’s assume it is c:\winxpSp3
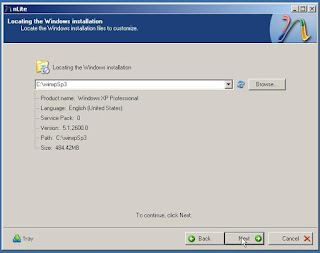
3.Run Nlite, in the welcome page, select language.
4.Locate the XP distribution folder, in this example, it is c:\winxpSp3, Nlite will detect the language, service pack, and version of your Win XP
5.In “Presets” window, use one of the previous settings (if you have) or just click “next” button.
6.In “Task Selection” window, click “All” button, then click “Drivers” button, which means I don’t integrate particular drivers to this CD, because I may use this CD to install my uncle’s computer that has different video card and sound card.
7.In “Service Pack” window, select the sp3 file “WindowsXP-KB936929-SP3-x86-ENU.exe”,Nlite will automatically extract and integrate sp3 to the xp distribution folder(c:\winxpSp3).
After the integration, the version number has been changed.
8.In “Hotfixes, Add-ons” window, insert all the hotfixes, be careful the sequence of the hot fixes, I failed several times because of this, you should put IE7 installer first, then IE7’s 2 hot fixes, and small number is first, KB938127 then KB956390, it may cause some problems if KB956390 is ahead. Use the small green button that locate on the right side to adjust the sequence; then add windows media play and its hotfixes and all the xp service packs, check the sequence as well. Finally, you should get something like this:
9.In “Components” window, I simply selected “Movie Maker” and “Music Samples” because I never use them. You can remove more unused components if you want to.
10.In “Unattended” window, you can provide answers to all of the questions that xp normally asks during the installation. In “General” tab, enter the Product key, I also turn off firewall and Hibernate because I have Symantec firewall and I think Hibernate is useless.
11.In “RunOnce” tab, you can add some commands here, and they will be executed on first user logon. Think about this, if I put a Trojan horse here, and release this combination CD to Internet, someone download and install it, what happens? Haha, you’re on my control.
12.In “Users” tab, enter password for Administrator. I also added a user for daily uses, it is not good to log on as administrator all the time.
13.In “Regional” tab, select the Time zone.
14.Work through all tabs and make adjustments if needed
15.In “Options” window, I only changed the “TCP/IP patch” to 100, it will certainly speed up my emule and BT.
16.In “Tweaks” window, I selected to show “My document icon” and “My computer icon” on desktop; there’re so many items you can select.
17.After finish all the settings, Nlite will start the process
18.When the process go through Windows media Player installer, Nlite will automatically run wmp11 slipstreamer to extract and integrate wmp11 to distribution folder.
19.Next window is making Bootable ISO, you can either create image or burn it directly, I suggest creating an image, and then you can test it using Vmware or Virtual PC. Enter a label name, click “Make ISO”, select the location of ISO file.
20.Now you have a bootable ISO image of Windows XP SP3+IE7+WMP11! Before you burn a CD with this image, you’d better test it with Vmware or Virtual PC, because exception is not predictable, install it in a Virtual machine, and see if it runs well.


 Preparation: