Lab Section: Router and Switch
Lab Title: VLAN Configuration
Purpose:
1. Understand how to setup VLAN.
Preparation:
1. Basic command of switch: enable, config terminal, hostname, banner, exit, end, show, no, etc.
2. 3 ways to create VLAN: Privileged EXEC mode (vlan database); Global Configuration Mode (vlan vlanid); Interface Configuration Mode (config-if)
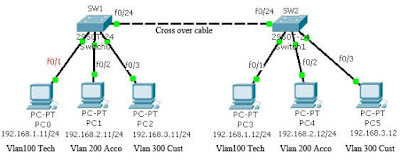
Topological

Require
1. Technical Support Team: Vlan name is Tech, Vlanid=100, Description: For Technical Support team
2. Accountant Department: Vlan name is Account, Vlanid=200, Description: For Accountant department
3. Customer Service Department: Vlan name is Customer, Vlanid=300, Description: For Customer Service Department
Procedure:
1. Setup hostname, banner and password:
Switch>en
Switch#conf t
Switch(config)#hostname SW1
SW1(config)#banner motd $
Enter TEXT message. End with the character '$'.
Welcome to Valute IT Virtual Lab$
SW1(config)#enable password cisco
SW1(config)#enable secret cisco12345
SW1(config)#exit
2. Create vlan in Privileged EXEC mode
SW1#vlan database
SW1(vlan)#vlan 100 name Tech
SW1(vlan)#exit
SW1#show vlan
3. Create vlan in Global configuration mode:
SW1#conf t
SW1(config)#vlan 200
SW1(config-vlan)#name Account
SW1(config-vlan)#end
SW1#show vlan
4. Create vlan in Interface configuration mode:
SW1#conf t
SW1(config)#interface f0/3
SW1(config-if)#switchport mode access
SW1(config-if)#switchport access vlan 300
% Access VLAN does not exist. Creating vlan 300
SW1(config-if)#no shutdown
SW1(config-if)#end
SW1#show vlan
5. Setup the vlan description:
SW1#conf t
SW1(config)#interface vlan 100
SW1(config-if)#description ?
SW1(config-if)#description For Technical Support team
SW1(config-if)#no shutdown
SW1(config-if)#exit
SW1(config)#interface vlan 200
SW1(config-if)#description For Accountant department
SW1(config-if)#no shutdown
SW1(config-if)#exit
SW1(config)#interface vlan 300
SW1(config-if)#description For Customer Service Department
SW1(config-if)#exit
6. Change vlan name:
SW1(config)#vlan 300
SW1(config-vlan)#name Customer
SW1(config-vlan)#end
SW1#show vlan
7. Assign switch port to vlan:
SW1#conf t
SW1(config)#interface fastEthernet 0/1
SW1(config-if)#switchport mode access
SW1(config-if)#switchport access vlan 100
SW1(config-if)#no shutdown
SW1(config-if)#exit
SW1(config)#interface fastEthernet 0/2
SW1(config-if)#switchport mode access
SW1(config-if)#switchport access vlan 200
SW1(config-if)#no shutdown
SW1(config-if)#exit
8. Setup trunk port, this port is used to connect to other switch
SW1(config)#interface f0/24
SW1(config-if)#switchport mode trunk
SW1(config-if)#no shutdown
SW1(config-if)#end
SW1#show running-config
9. Do the exactly same steps with Switch 2 (except hostname).
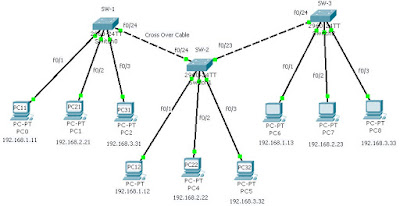
10. Setup the PCs’ IP address (refer to the topologic graph above).
11. Use “ping” to verify the isolation.
Further:

*******************************************************************************
1. For more information, please visit my blog http://jhuang8.blogspot.com/.
2. Video demo is located in http://www.valit.ca/lab/.
No comments:
Post a Comment